YOLOv8🔥has been released by Ultralytics on (10th, Jan 2023).
It has provided advancements in computer vision that have brought about a massive novelty in the way we perceive, analyze, and understand the visual world. It will allow for unprecedented possibilities in various fields.
Considerable improvements have been made in terms of speed, accuracy, and architecture. Its implementation is done from scratch, and no major modules (i.e model architecture) have been used from YOLOv5. It is faster in speed and more accurate than its previous version (YOLOv7), and it has achieved a new high in terms of Mean Average Precision (MAP) with a score of 53.7.
In this article, we will focus on steps that are required to do training of YOLOv8 on custom data. You can follow mentioned steps below to train YOLOv8 on your own data. All mentioned steps have been tested properly and working fine on Windows and Linux operating systems.
- Installation of Modules
- Pretrained Object Detection
- Train YOLOv8 on Custom Data
- Inference with Custom Weights
Installation of Modules
YOLOv8 released a package named “ultralytics”, that you can install with the mentioned command below.
pip install ultralytics==8.0.0
or
# latestversion
pip install ultralytics
The above command will install all the packages that are required to use YOLOv8 for detection and training on your own data.
Note: Make sure, that you have python 3.7.0 or newer installed on your system.
Pretrained Object Detection
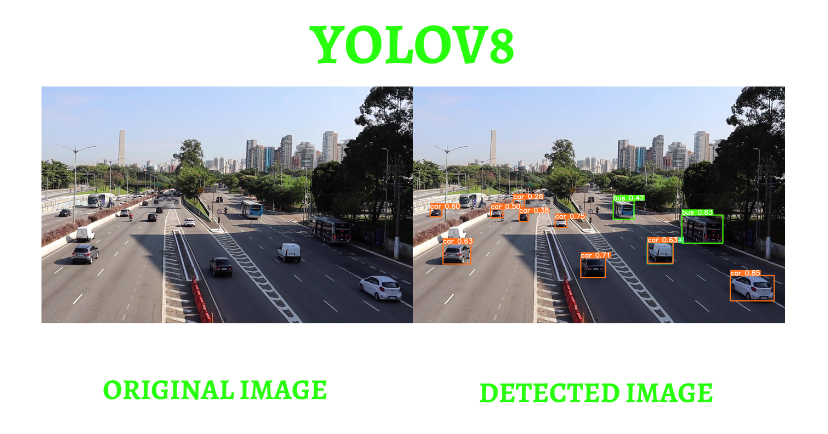
What will be your feeling? if you will need to run a single command that can do object detection in an efficient way and provide you results with better accuracy and fast speed.
You can run the mentioned command below in terminal/(command prompt) to do detection with pre-trained weights on your selected video/image using YOLOv8.
For Image
yolo task=detect mode=predict model=yolov8n.pt source="test.png"For Video
yolo task=detect mode=predict model=yolov8n.pt source="test.mp4"You will get the results in the current directory inside the “runs/detect/exp” folder if everything works well.
Train YOLOv8 on Custom Data
The steps for training a YOLOv8 object detection model on custom data can be summarized as follows,
- Collect data
- Label data
- Split data (train, test, and val)
- Creation of config files
- Start training
Step-1: Collect Data
Create a dataset for YOLOv8 custom training. if you have no data, You can use the dataset from the openimages database or 👇
⭐ Create your own Data by reading the article “Extraction of a frame from videos”
YOLOv8 takes label data in the text (.txt) file and has the following format:
<object-class-id> <x> <y> <width> <height>
Step 2: Label Data
You can use the labelImg tool or Roboflow platform for data labeling, whatever suit your needs. If you want to understand the workflow of the labelImg tool, then👇
👉Don’t forget to check out an article Labelling data for object detection (Yolo).
Step-3: Split Data (Train, Test, and Val)
When you want to train a computer vision model on custom data, it’s important to split your data into a training set and a test set. The training set is used to teach the model how to make predictions, while the test set is used to evaluate the accuracy of the model. The (80–20%) split ratio is a common one, but the exact ratio can depend on the size of your dataset and the specific task you’re working on. For example, if you have a small dataset, you may want to use a higher percentage of it for training, while if you have a large dataset, you can afford to use a smaller percentage of it for training.
👉 For data splitting, you can take a look at split-folders that will split your data randomly into the train, test, and validation.
Folder structure:
├── yolov8
 ## └── train
 ####└── images (folder including all training images)
 ####└── labels (folder including all training labels)
 ## └── test
 ####└── images (folder including all testing images)
 ####└── labels (folder including all testing labels)
 ## └── valid
 ####└── images (folder including all testing images)
 ####└── labels (folder including all testing labels)
Fig-1.4: So far, you have done good work learner. Just a few steps away from YOLOv8 Magic (Author Appreciation)
Step-4: Creation of Config Files
Creating a custom configuration file can be a helpful way to organize and store all of the important parameters for your computer vision model.
Create a file having the filename “custom. yaml”, inside the current directory where you have opened a terminal/(command prompt). Paste the below code in that file. set the correct path of the dataset folder, change the classes and their names, then save it.
path:  (dataset directory path)
train: (Complete path to dataset train folder)
test: (Complete path to dataset test folder)
valid: (Complete path to dataset valid folder)

#Classes
nc: 5# replace according to your number of classes

#classes names
#replace all class names list with your classes names
names: ['person', 'bicycle', 'car', 'motorcycle', 'airplane']
Note: Make sure to set the correct path of training and testing directories, because the training process will totally dependent on that file.
Step-5: Start Training
Once you’ve completed the preprocessing steps, such as data collection, data labeling, data splitting, and creating a custom configuration file, you can start training YOLOv8 on custom data by using mentioned command below in the terminal/(command prompt).
yolo task=detect mode=train model=yolov8n.pt data=custom.yaml epochs=3 imgsz=640task = detect (It can be segment or classify)
mode = train (It can be predict or val)
model = yolov8n.pt (It can yolov8s/yolov8l/yolov8x)
epochs = 3 (It can be any number)
imgsz = 640 (It can be 320, 416, etc, but make sure it needs to be a multiple of 32)

YOLOv8 will not start training on custom data if any image is corrupt, If some label file will be corrupted so there will be no issue in training because YOLOv8 will ignore that (image and label) files.
👉Wait for training to complete, and then do inference with newly created weights. Custom-trained weights will be saved in the folder path mentioned below.
[runs/train/exp/weights/best.pt]
Inference with Custom Weights
Once your model is trained, you can use it to make predictions on new data. Use the mentioned command below for detection with custom weights.
yolo task=detect mode=predict model="runs/train/exp/weights/best.pt" source="test.png"or
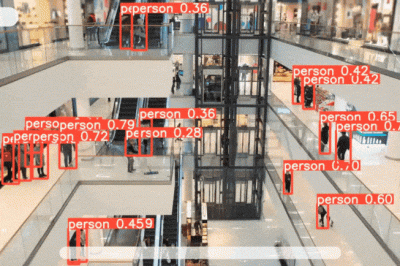
yolo task=detect mode=predict model="runs/train/exp/weights/best.pt" source="test.mp4" I have used Person data for training, the results with custom weights are shown below.
Fig-1.6: YOLOv8 Trained on Custom Data (Live Dem
That is all regarding “Train YOLOv8 on Custom Data”. you can try this on your own data.